 Download
 Order
OrderHow to Convert Negatives to Digital Photos - Simple and Effective Methods
Are there some photo negatives that you’d like to digitize? To preserve these fragile and meaningful pieces of history you should use only the best methods. We’re going to show you how to convert film negatives to digital images using 5 tried-and-tested techniques. This includes scanning, using a digital camera, mobile processing, and converting old photos online.
In addition, you’ll learn how negatives work and what to do if you’re not happy with the quality of a scanned picture. Now let’s see which way to turn negatives into digital photos suits you better.
What is a Negative?
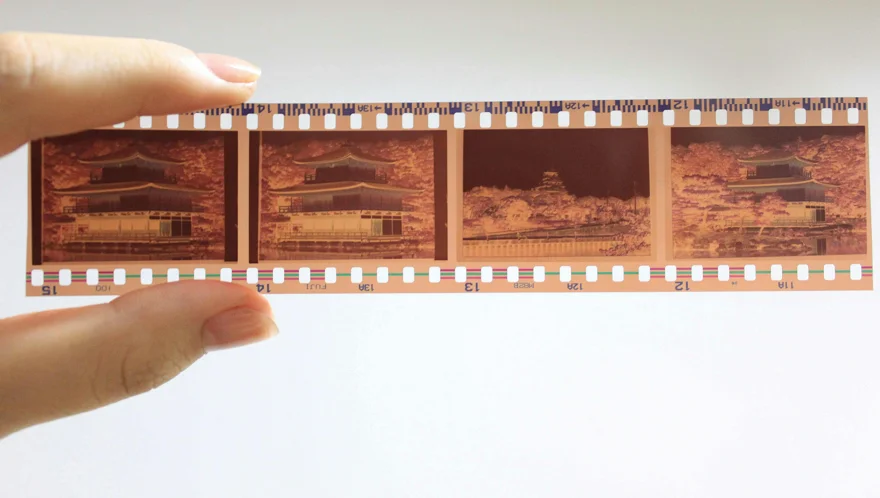
A negative is a strip of transparent plastic film that contains an image. It’s loaded into a 35mm film camera and exposed to light. This results in a reverse image - you might have noticed that light areas in such a photo look dark and dark areas look light. As for color negative films, they have multiple layers and seem primarily red. They are traditionally developed in a darkroom with the use of special chemicals and equipment.
This is what the negatives are. Now, let’s explore some common reasons why you might need to learn how to turn negatives into photos.
Why Convert Photo Negatives to Digital?
Digitizing photo collections has become extremely popular in recent years, and for good reason. Let’s see what benefits it may offer:
- Preserve Family Memories If you want to pass down family heritage to the next generation, you should keep up with the trends to make the memories accessible and entertaining for young ones.
- Sort Photos and Save Space You can convert film camera pics to digital images and free up some space. You’ll only need a small flash drive or a cloud storage account to store old photos safely.
- Restore Damaged Pictures Once you have digital copies of your negatives, you can fix blur, tweak colors, correct overexposure, and remove defects. You can also make portraits look more clear to accentuate facial features of your family ancestors. This way, future generations can see where exactly their beauty comes from!
- Share Your Favorite Photos Do you enjoy sharing meaningful family photos? Then digitizing film negatives will open up new horizons for you. If your family has an extensive collection of photos, you can even create an account to share such valuable historical photos with the world. Not only friends and family, but also creative enthusiasts and history geeks will appreciate it.
How to Convert Negatives to Digital - 5 Methods
Very few fans of analog photography have an equipped darkroom at home. But you don’t need it to make a digital copy of a negative. We’re going to talk about 5 ways to convert film negatives without leaving the comfort of your home. Whether you prefer using services or processing your pictures on your own, you’ll discover a suitable method below.
Method 1. Turn Negatives into Digital Photos with a DSLR Camera
A digital camera allows you to capture high-quality photos without missing any detail in your negatives. If you have a DSLR or a mirrorless camera, read on to learn how to digitize negatives with it.
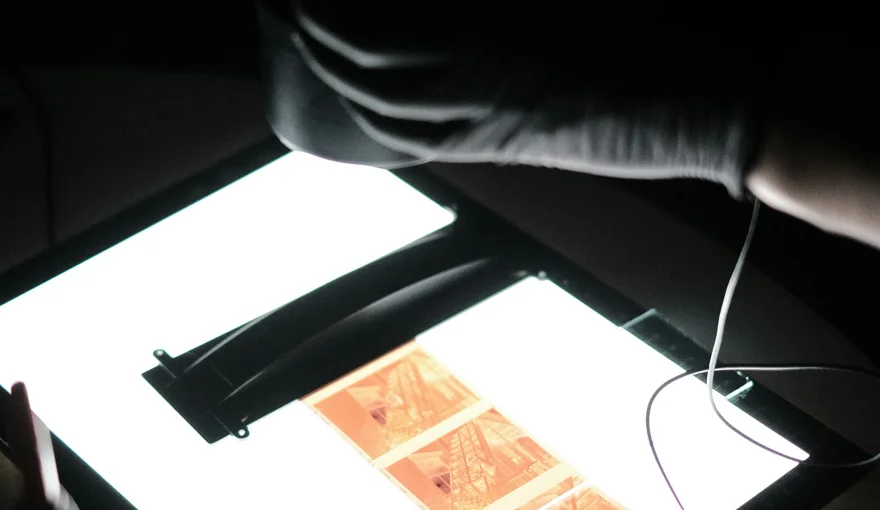
This method involves using a couple of other tools. For starters, you need a DIY or a dedicated metal film holder. To avoid distortions, you can also use a camera tripod or find a suitable surface to put the camera on. You should also choose a backlight source - it may be a smartphone, a tablet, or a lightbox. Once you get ready with the tools and accessories, put a negative in a film holder and place it on your light source. Then delicately wipe away the dust and take a shot with your camera.
 Word of Advice
Method 2. Transfer Negatives to Digital Using a Scanner
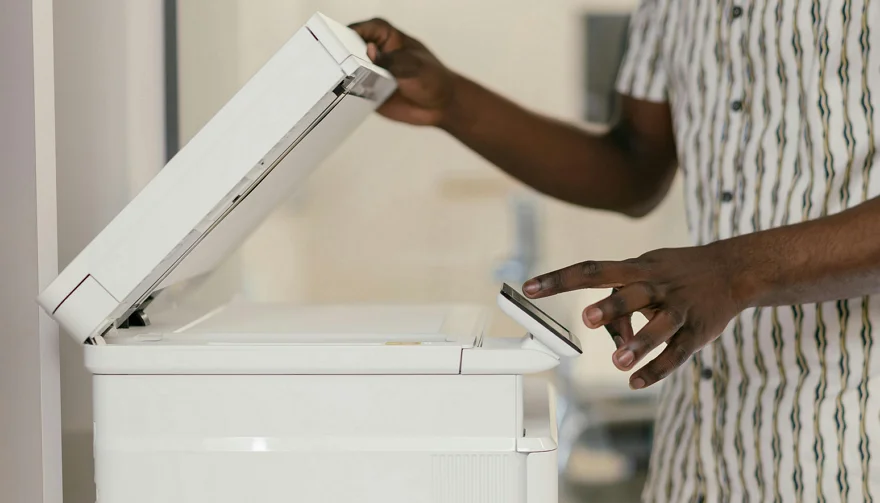
Professionals use drum and slide scanners for converting film negatives. However, a regular scanner has enough capabilities for this task. If you're ready to invest in a good device, consider options from this review on the best scanners for old photos. Want to digitize negatives with a flatbed scanner? Here’s how to turn film into digital with it.
Remove the dust from the scanner bed glass and negative. Next, place your film negative along one of the edges, put a sheet of plain white paper on top of the picture, and shine on it using a desk lamp. Finally, scan your photo.
Method 3. Convert Negatives to Digital Photos with iPhone
If your smartphone takes high-resolution pictures, you can use it to digitize old photos, too. There are 2 ways to do it: by using the phone camera or by installing a dedicated mobile app. Let’s take a closer look at each method.
Digitizing a negative with your phone camera is free, but the quality of the scanned images depends on the capabilities of your smartphone. If this method suits you, follow these instructions. First, you need to prepare a light source to illuminate your film from behind: flash, lightbox, etc. Turn it on, place the negative on the light source, and take a shot. To capture sharp images on your iPhone, make sure the camera lens is clean. It is better to wipe dust using a microfiber cloth if you have it at your disposal.
The second method is even easier. But take into account that you might need to purchase another program to add final touches to the scanned picture. To scan old photos within an app, consider downloading a negative image converter like FilmBox or PhotoScan. We recommend you go to a low-lit room and only use a backlight for taking your photos. You can hold the phone above the negative or hold the film vertically in front of the light source. Then run the desired app and capture your photo. If necessary, use the app’s tools to enhance your scan.
Method 4. Digitize Film Negatives in a Local Photo Shop
If you’re short on time or don’t have the needed equipment at your disposal, visiting a photo shop might be the right choice for you. This is perfect for those who not only need to know how to scan but also how to make prints from negatives. But it might take some time to find a budget-friendly service to digitize images without breaking the bank. Consider going to a photo studio, Walmart, or Walgreens.
Method 5. Convert Negatives to Digital Photos Online
There’s another effortless way to try - using online negative scanning services. All you need to do is make your order, ship your films, and wait for the digitized pictures. To convert negatives to digital, services like ScanCafe can help you. This is a pain-free method, but it has its drawbacks. First, it might be rather costly if you order photo restoration as well. Plus, you can’t control the process.
What You Can Do with Scanned Negatives
Now you know how to convert film negatives to digital pictures using 5 different methods. When your photos are ready, you can store them as they are. But it’s also a good idea to develop and restore your pictures before organizing them to have perfect photos readily available. Besides, you can easily improve the quality of scanned images in post-production in case of quality loss.
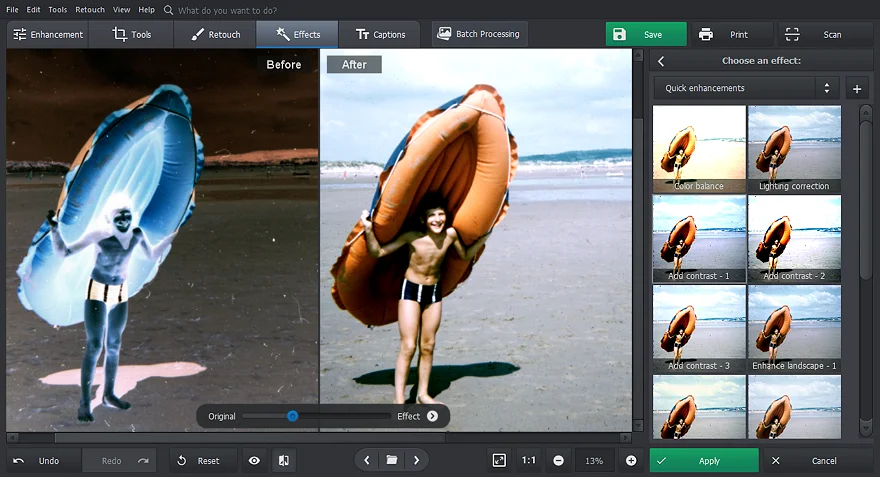
You can process old pictures with PhotoGlory, automatic program to restore old photos. It offers lots of AI-powered and manual tools for editing pics with precision. You can use this software to convert a negative to a positive image, repair damaged pictures, colorize grayscale photos, and more. These are 4 easy steps to edit digital negatives with PhotoGlory:
- Install the Software First, download and install PhotoGlory on your computer. Launch the program and load your image by clicking Open Photo.
- Crop Out Unwanted Areas To get rid of film strip borders, use the Crop and Rotation feature from the Tools tab. Drag the handles to choose the area you want to keep and hit Apply.
- Convert Negative to Positive Switch to the Enhancement tab and select Negative to correct the image.
- Enhance the Photo Quality Add a final touch - enhance your image using the sliders or one-click filters. And your developed negative is ready to go!
As you can see, digitizing film strips is a breeze nowadays and doesn’t require any professional skills or knowledge. There are lots of DIY methods, and we’ve shown you the 5 best ways that you can try with no hassle. Now it’s time to renew your old photos. Choose the desired method and begin converting negatives to digital today!
 Free Download