 Download
 Order
OrderHow to Restore Old Pictures - The 7 Best Ways in 2026
Are your precious family photos faded, creased, scratched, or even torn right down the middle? If you are wondering how to restore old photos, here you’ll find 7 different but doable ways—from advanced desktop software and instant AI automation to manual restoration techniques and professional services, both free and paid. Compare the pros and cons of each solution to find the perfect match for your budget, time, and skill level.
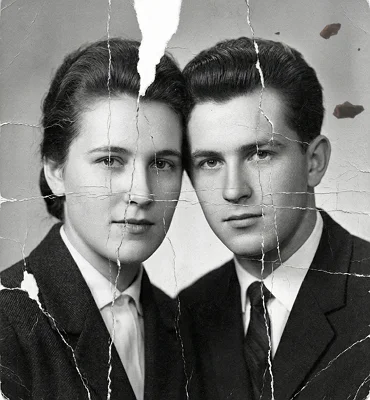
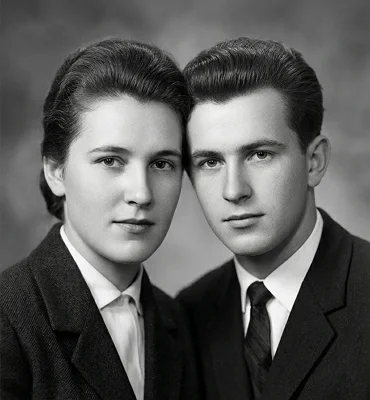
A nice result, isn't it? Can't wait to do the same? Let’s dive straight into our top recommendations.
Ready to see how you can heal cracks and boost faded colors of your old images? Let’s have a look at all the methods in turn.
Way 1. Restore Old Pictures with PhotoGlory
In the photo editing world dominated by Adobe products, PhotoGlory clearly stands out. This convenient software was exclusively designed to restore your photographs in a single click. Users of all ages and skills can easily learn to operate this program and its many tools to breathe new life into their family archive. You can even batch-edit an entire album instead of processing one picture at a time. Just download the free trial version to see how you can use it.
Step 1. Download PhotoGlory
First, download and install the software to your PC. The setup wizard will aid you all the way.
 Download Now!
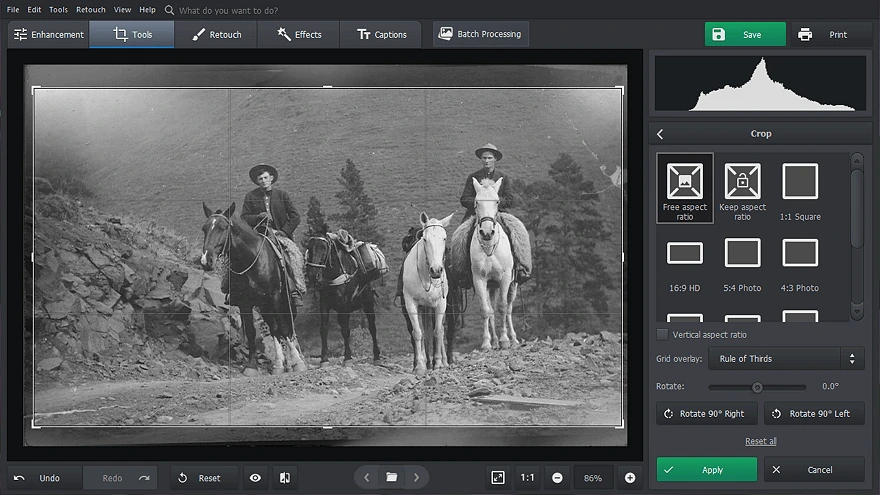
Step 2. Cut Away Torn Corners
Now, open your old photo within the software. If the edges of your picture are too damaged to be properly restored, crop them off. Switch to the Tools tab and pick the Crop feature. Place the markers so that the torn corners are out of the frame and hit Apply.
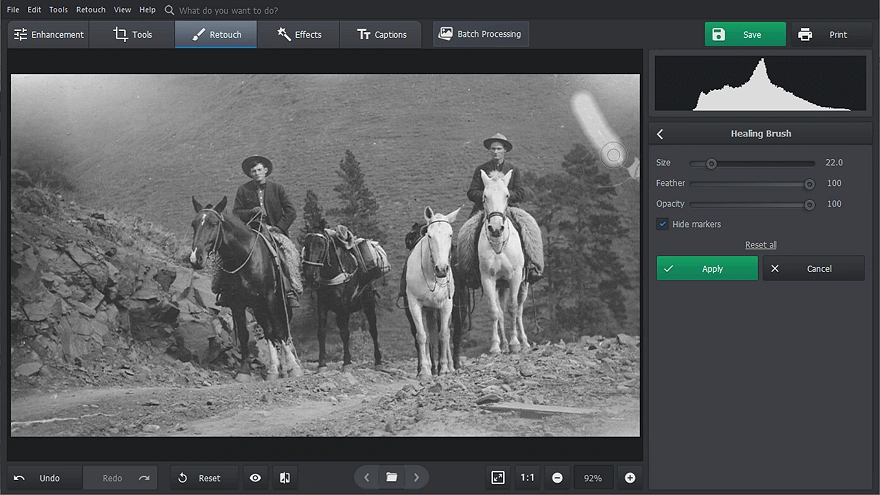
Step 3. Erase Cracks and Stains
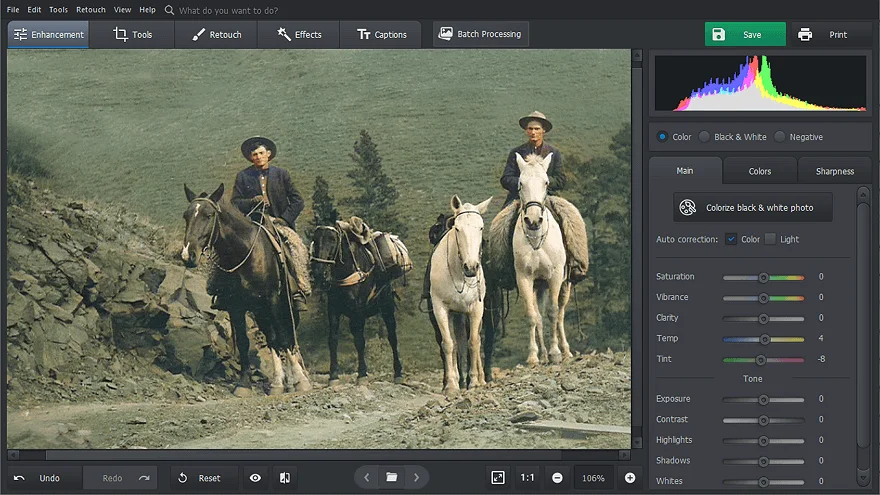
Go to the Enhancement tab and click Restore Old Photo to remove defects on your image automatically. If some scratches and cracks remain, switch to the Retouch tab. There you’ll find a variety of tools to clean up imprints of time. Use the Patch tool to conceal larger defects like tears or missing parts. Go with the Clone Stamp tool to get rid of medium-sized flaws: stains, blobs, and rips. The Healing Brush is useful if you want to delete smaller imperfections like creases or dust.
Step 4. Restore Washed Out Colors
If the colors in your old photo are faded, give them a little boost. PhotoGlory offers both manual and automatic color correction. Find Colors sliders under the Enhancement tab and experiment with them to get rid of color cast or make hues juicier. If your initial picture is black and white, PhotoGlory allows you to colorize it in a click, then modify it manually - just like a coloring book.
And there you go - your old photo looks so much better now. It has no cracks or stains and all the colors are juicy. And it only took us a few minutes. That is what PhotoGlory is all about - with it, you can achieve pro-level results with minimum effort. So don’t let your photo archive fall victim to time. Use PhotoGlory’s immense tool arsenal to restore it.
- Combines lightning-fast AI restoration with powerful manual retouching tools.
- Guarantees total privacy by keeping photos safe on your local drive, completely inaccessible to AI.
- Focuses purely on restoration, making it easier to learn than general editors.
- Requires a desktop computer (exclusively available for Windows).
- Reserves some advanced features for the full version.
Ready to experience the full power of PhotoGlory? Hit the button below to download it and restore your old photos with automatic colorization and easy-to-use enhancement tools!
Download Now!
Way 2. Repair Old Photos with Photoshop
Since we talk about photo editing, there is no way we can avoid bringing up Photoshop. This Adobe product is immensely powerful and feature-rich. The downsides of this software are its price and confusing workflow. But is it at least good at restoring old photos? Let’s have a look.
- Open your image in Photoshop. Open your digital photo within the software. Then, click Layer -> Duplicate layer.
- Erase defects. Now use various tools to get rid of rips and stains. The Spot Healing Brush works well with smaller defects, while the Clone Stamp conceals bigger flaws on complex backgrounds.
- Colorize your image. Unless you have the latest version of the software, you need to do it by hand. The new version of Photoshop comes with a neural filter that automates the colorization process.
- Fix your faded photo. If your image is already colored, but looks dull, use Curves to enhance colors, get rid of color cast, and boost faded hues.

So you see - Photoshop is capable of repairing old photographs. However, not all the versions offer automatic colorization. And besides, the software is still hard to grasp and costs quite a lot. But if you know your way around it, Photoshop is more than worthy photo restoration software.
- Modern Neural Filters make colorization and scratch removal incredibly fast.
- Massive library of online tutorials covers almost any specific damage type.
- Complex interface creates a notoriously steep learning curve for beginners.
- Expensive monthly subscription replaces a convenient one-time purchase.
Way 3. Restore Photographs Manually
If you don’t think you have the chops to restore damaged photos digitally, you can always choose the good old manual approach. Turns out, the process is not that difficult. Just follow these few simple steps to retouch your old photographs by hand.
- Separate pictures that are stuck together. Do not attempt to detach them from each other. Instead, submerge your photos into distilled water and leave them for 30 minutes. Then, gently slide the pictures apart and let them dry.
- Remove dust and residue. Use a soft-bristle brush to carefully clean off any sand, dust, or residue from your image. If some stains prove to be stubborn, use warm water to get rid of them. Just don’t rub the surface too much.
- Repair tears with tape. But not just any tape. Make sure to buy an acid-free option. Buy it at any local stationery store and use it to mend rips on your image.
- Fix curled pictures. Create an impromptu humidification chamber - pour water into a plastic bin, put a wire rack inside it, and place your curled photo inside the bin so that it doesn’t touch the water. Close the lid and let the picture sit there for a few hours. Then dry your photo under a weight.
Now you have an idea of how to restore old damaged photos. Doesn't sound that hard, right? You just need a bit of time, a few simple tools, and a bit of elbow grease. But if you are still not sure that this method of retouching old images is up your alley, the next one might be just the thing for you.
- Keeps the tactile, authentic feel of the original, physical historical photograph.
- Doesn't require any technical computer skills, scanners, or software downloads.
- Risks destroying family heirlooms with a single mistake.
- Fails to restore severe fading or bring back completely flaked-away details.
 Word of Advice
Way 4. Recruit Help to Restore Old Photos
Sometimes it’s better to call for outside help. There are countless offers for both digital and manual restoration. First, try seeking a local photo studio that provides this kind of service. Make sure to pick the best retoucher available - you’ll be handing them the only physical copies of your images.
Alternatively, you can recruit someone to touch up your digital images. This way you won’t have to share the last remaining copies of your photos. You can go with an online service or alternatively order a freelance gig - all depending on your aspirations and budget.

And speaking of budget. Sadly, these photo restoration services are quite a costly thing, which might not sit well with some people. Another dealbreaker is that the pictures of your relatives and forebears will be exposed to people you don’t know. Think carefully whether this is acceptable.
Despite its downsides, this method of restoring old photos is still a feasible option, especially for those who have little skill in retouching or don’t have that much time.
- Requires zero effort while delivering professional, gallery-quality results.
- Reconstructs heavily damaged pictures that would challenge a novice.
- Charges high rates per individual photograph.
- Risks losing physical copies in transit and sacrificing complete photo privacy.
Way 5. Repair Old Photos on Mobile
Prefer to do everything with your trusty cell phone? Then you’ll love this method of fixing old photos as it involves mobile devices. The market offers multiple applications that can help you enhance your old photos with a few swipes and taps. Don’t think it’s possible? Then let’s have a look at how to operate a nifty little tool called Colorize: Old Photo Colorizer.
- Open your picture with the app. You can either choose a photo from your gallery or scan your old image with the phone’s camera.
- Get rid of rips and creases. Now let's repair your old image. Choose the Remove the Scratch and Repair Photo option and wait a few seconds while the application analyzes your image and deletes its flaws automatically.
- Colorize your image. Want to bring some colors back and fix the flaws as well? Select the Colorize and Recover B&W Photo option. After automatic coloring and restoring, you can save your freshly looking picture.

Granted, this mobile application works fine, but it does not allow any manual tweaking or colorization. This is quite a disappointment, since pictures can really benefit from some personal touch. Besides, it’s only available for Android-based devices. But still, if you find this method of touching up old images appealing, give it a go. And in case you are an iPhone user, have a look at a decent iOS alternative.
Want to know more ways you could repair your old photos? We know where you can look for them. Make sure to read a FixThePhoto article on photo restoration alternatives. You will definitely find a perfect tool for you.
- Provides ultimate convenience by repairing photos from your couch.
- Offers high accessibility for a quick cleanup without any learning curve.
- Lacks precise manual tools, making it impossible to fix spots by hand.
- Restricts high-detail work due to small phone screens and reduces final quality.
Way 6. Enhance Old Photos Online
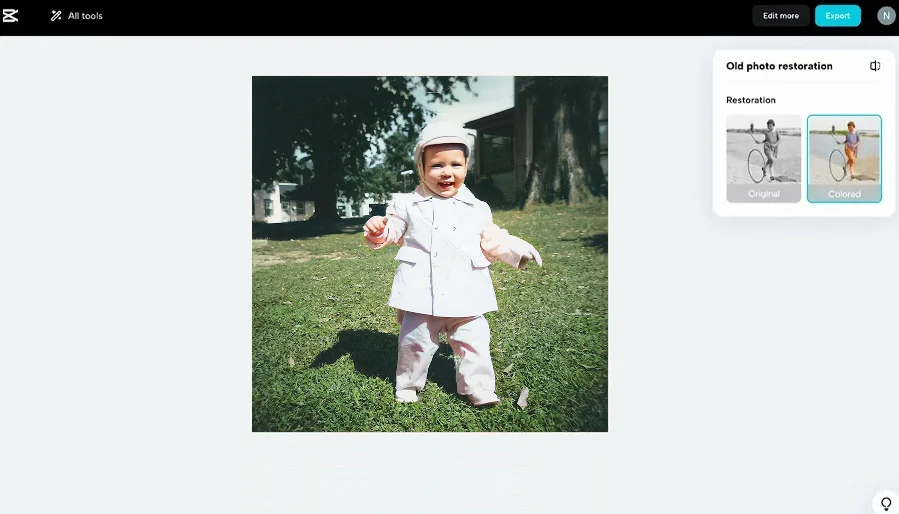
If you don't want to download bulky software or waste time on complex setups, turning to a web-based solution is your best option. For instance, CapCut, which is well known for its video editing capabilities, has an equally impressive tool called AI Old Photo Restoration available online on a freemium basis.
- Upload Your Image. Go to the website, click on the "Try Online" button, and simply drag and drop your scanned photo into the panel.
- Apply Auto-Correction The second your photo hits the system, its intelligent algorithms automatically get to work. It instantly detects and repairs scratches, cancels out background noise, and reduces blur.
- Colorize and Polish Switch between the "Original" and "Colored" enhancement options to automatically inject realistic hues into a grayscale image. For a little more flexibility, simply select “Edit more” and open up CapCut’s online editor for tweaking the filters to perfection.
Clearly, this web-based solution is a lifesaver in terms of automatic touch-ups. It does wonders in providing facial clarity and offers free essential tools to get you started. However, since this online editor is fully automated, there is no opportunity to perform pixel-perfect manual tweaks. Yet, if you need the job done fast, CapCut will do the trick.
- Highly accessible from any device directly through your web browser.
- Excels at sharpening blurry faces and clearing background noise in seconds.
- Requires a constant, stable internet connection to upload and process files.
- Lacks fine-tuned manual brushes, leaving you at the mercy of automation.
Way 7. Fix Old Photos with AI
If you’re looking for a next-generation approach to photo restoration, generative AI technology offers a completely different alternative. While other technologies require manually adjusting sliders and settings, you can use Google Gemini to reconstruct missing details, erase deep tears, and reimagine damaged backgrounds simply by using clear, natural language. It’s like having a professional graphic designer waiting ready to follow your every command.
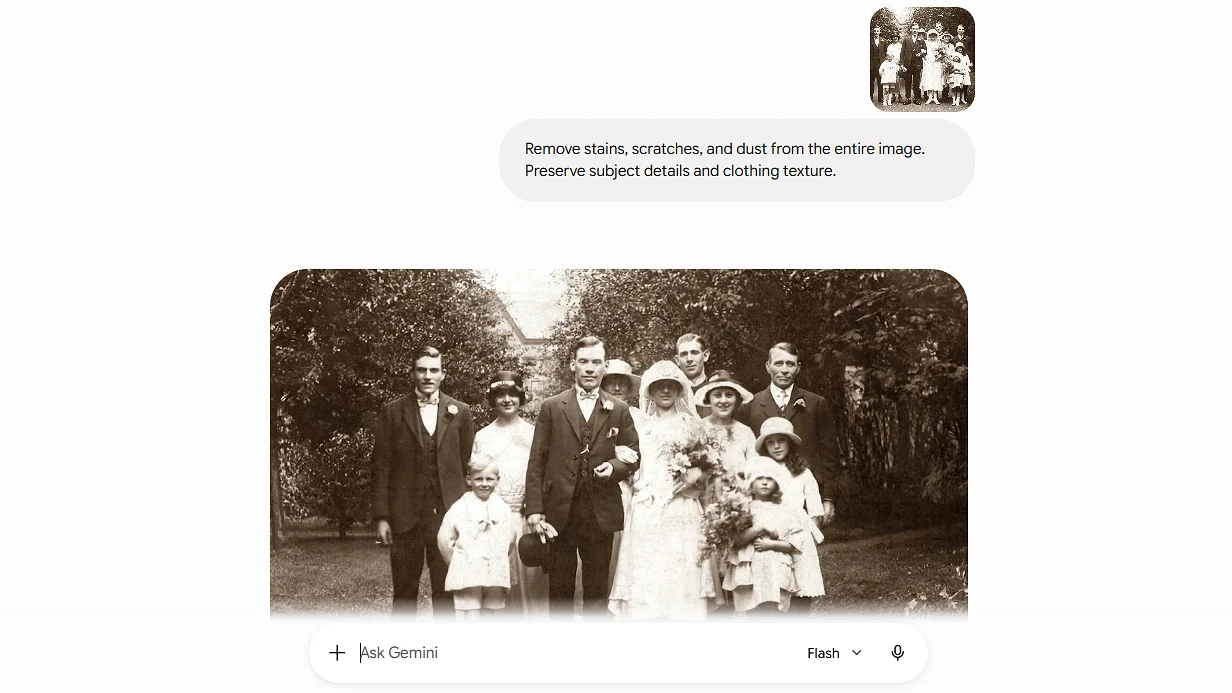
- Upload to Gemini. Open the Gemini app or web interface and upload a high-quality scan or snapshot of your old photo.
- Use a Precision Prompt. To get the best results, you need to tell Gemini exactly what to fix. Prompts can vary wildly depending on the type of damage and the specific result you want, ranging from short commands to detailed instructions. If you are dealing with a portrait, start with a simple request like "Remove stains, scratches, and dust from the entire image. Preserve subject details and clothing texture."
- Generate and Refine. Hit the Send button and let Gemini analyze the damage. Within seconds, the AI will rebuild the missing pieces of the image. If a detail doesn't look quite right, simply reply with your adjustments until the result's perfect.
This cutting-edge AI is incredibly smart and can literally reconstruct and seamlessly patch parts of a photo that have been completely torn away. The only catch is that it relies entirely on the accuracy of your instructions, meaning you might have to experiment with your wording a few times to get the precise look you are chasing. Still, for heavily damaged images, this method feels like pure magic.
- Rebuilds missing or torn parts of a photo that standard tools cannot guess.
- Restores damaged photos without complex editing sliders.
- Over-generates inaccurate faces or backgrounds if prompts are imperfect.
- Requires patience and trial-and-error to find the phrasing for desired results.
Now you know how to restore your old pictures in 7 ways. In case you can’t decide on what route to take, we’ll try to make it easier for you. If you have no experience, time, or desire to do it yourself, recruit a pro. But if you prefer to have total control over the process, you can take matters into your own hands and try some manual restoration methods.
Digital restoration is also a way to go. For instance, if you have mastered Photoshop and don’t get scared by its price, use this powerful tool for your cause. If your budget and skills are limited, but you still wish to achieve a pro-level result, go with PhotoGlory. Try quick online tools or cutting-edge generative AI if you need a fast, budget-friendly fix or need to rebuild deeply damaged photos instantly. Whatever way you choose, just know that you are doing the right thing—keeping your memories alive.
FAQ
Thanks to modern technology, even photos with severe damage—like deep rips, heavy stains, fading, or water spots—can be brought back to life. Your approach just depends on how bad the damage is. Simple restoration requires no more than automated AI solutions. But when you need to manage each pixel in detail, desktop software designed specifically for photo restoration will come to the rescue.
In case you need something inexpensive, then there are numerous applications available that you could employ for such tasks, such as Colorize on your phone or web applications such as CapCut, along with AI-based generative tools such as Google Gemini. These are usually free to use.
Yes, and it’s usually the best route if you want pro-level results right from your couch. Specialized software like PhotoGlory is dedicated exclusively to photo restoration. It features smart, one-click fixes for scratches, automatic colorization, and intuitive healing brushes that anyone can master without a steep learning curve.
All you have to do is upload a digital copy of the old photograph on a platform powered by AI, such as Gemini, or others available online. With a detailed prompt explaining what needs to be fixed, the AI will automatically identify the flaws in the picture, remove scratches, improve blurry facial images, and even add colors to the image.
When it comes to generative AI, the quality of your image boils down to how you describe the fix. For basic dust and scratch cleanups, short and direct commands do the trick. If you need to rebuild a heavily damaged image, use highly descriptive, multi-step prompts, such as this one for basic cleanup: "Remove all dust, light scratches, and small stains from this image. Keep the original details and contrast completely untouched." For heavy damage and reconstruction, try: "Seamlessly patch the torn sections in the background. Fix the deep vertical rip across the center by blending it with the surrounding texture. Maintain a realistic, historically accurate look."
Since 2003, our team has been creating photo software that blends deep photography expertise with modern technology. In these guides, we're happy to share our tips and tricks to help you easily rescue your images from the effects of time.